Blog Archives
Another year, another coffee and walnut cake
My husband celebrated his birthday on Saturday, which, of course means one thing: Coffee and walnut cake.
I was running around on Saturday morning, making a nice birthday breakfast, getting ready to take my daughter to a birthday party, wrapping presents, brushing teeth and negotiating the time it would take to bake the cake. Thankfully, I had blogged last year sending a message to Future Me about the ease of cooking this Nigella Lawson recipe and Past Me was entirely correct.
It was a breeze to make. 10 minutes prep. 25 minutes in the oven. Then boom! Done.
New year, new pasta
 Happy 2014 to you! I hope you had a wonderful holiday break!
We traveled down to Southern California to visit some of my family and friends before Christmas, enjoyed Christmas Eve, Christmas Day and Boxing Day here at home, and then headed to Lake Tahoe for a few days of R&R with friends! It was sadly snow-free, but still splendidly beautiful! We were able to do some ice skating, tubing and sitting in front of a roaring fire drinking hot chocolate. Idyllic!
I decided to kick off the new year by cracking open some cookbooks and finding a new lunch recipe that the kids might enjoy: Nigella Lawson‘s Spaghetti with Marmite recipe sounded deviously simple so I gave it a try. “I haven’t as yet found a child who doesn’t like it,” she wrote in “Nigella Kitchen” and I was sold.
What a recipe! It is so savory and great! My son had three helpings! I had two! My daughter had one! And my husband, who hates Marmite, enjoyed a bowl and couldn’t detect Marmite in the flavor (although he did comment that the kitchen smelled a little Marmite-y). Try this recipe for a quick, no-nonsense pasta dish that kids (and grown-ups alike) will love!

Spaghetti with Marmite
Serves 4-6, depending on age and appetite
12 ounces dried spaghetti
3 tbsp unsalted butter
1 tsp Marmite, or more to taste
freshly grated Parmesan cheese, to serve
Cook spaghetti in plenty of boiling salted water
When the pasta is almost cooked, melt the butter in a small saucepan and add the Marmite and 1 tbsp of the pasta water, mixing thoroughly to dissolve. Reserve 1/2 cup of pasta water; then drain the pasta and pour the Marmite mixture over the drained spaghetti, adding a little reserved pasta water to amalgamate if required. Serve with plenty of grated Parmesan cheese.
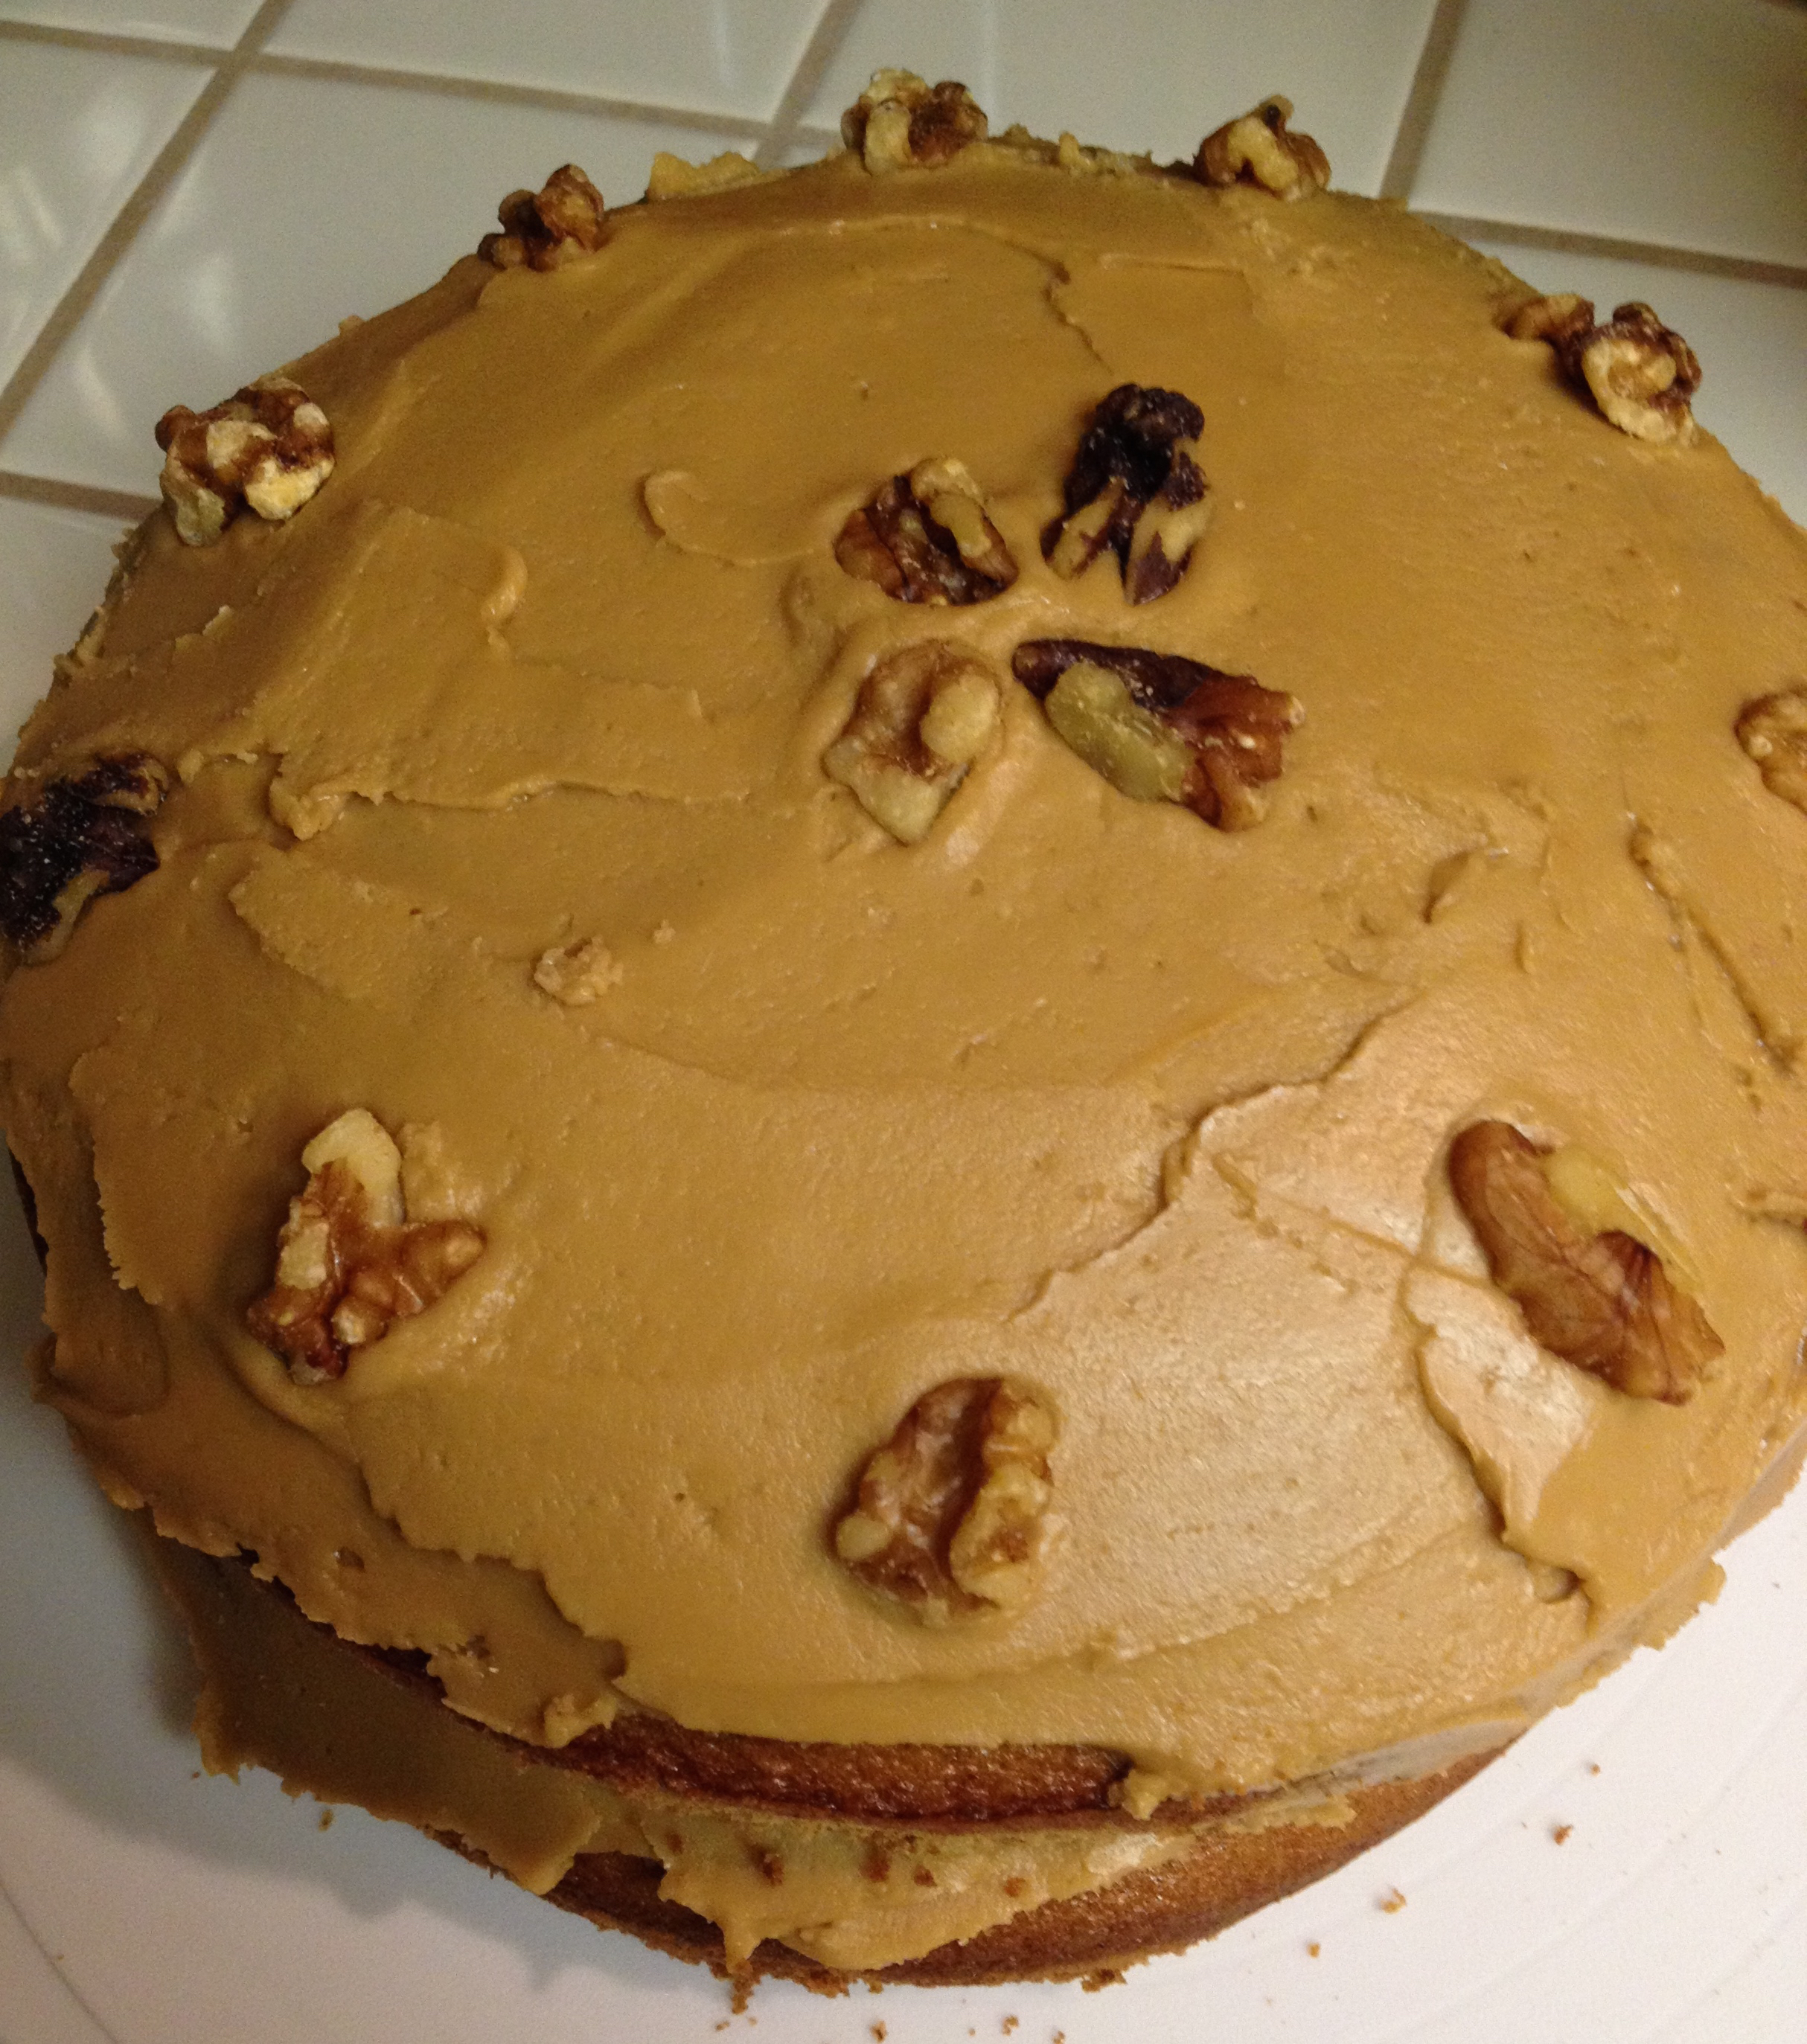
When a birthday calls for coffee and walnut cake …

My husband’s birthday is this month and I surprised him by making his favorite cake – a coffee and walnut cake. I first tried a recipe for this time last year and this year, I went back to it. If it’s not broken, why fix it, right?
Nigella Lawson’s recipe (from her “Nigella Kitchen” cookbook) proved again to be such a winning, no-nonsense recipe that I vowed to make it my go-to cake (which is exactly what I said last year). My husband adored it. My kids licked their plates clean and begged for more. And really – it is the easiest recipe. The problem, I fear, is that “coffee and walnut cake” still conjures up some mental images of slaving in the kitchen, crushing walnuts with my bear hands, agonizing over brewed espresso, and so forth and so on, that I’m actually immobilized when I think of making it, even when I rationally know it was easy enough to do the last time around.
I will let this blog post be a little pep talk to my future self. Self, make this cake again! It tastes amazing and is really shockingly fool-proof! Oh yes, and as a general buttercream frosting phobe, I must add that the espresso-ed up buttercream frosting is ridiculously delicious and would make anyone a believer.
Here’s the recipe again!
COFFEE AND WALNUT LAYER CAKE
For the sponge
1/2 cup walnuts (pieces)
1 cup plus 2 tablespoons superfine sugar
2 sticks unsalted butter (soft (plus some for greasing))
1 1/3 cups plain flour
4 teaspoon(s) instant espresso powder
2.5 teaspoon(s) baking powder
½ teaspoon(s) baking soda
4 medium egg(s)
2 tablespoon(s) milk
For the buttercream frosting
3 1/4 cups powdered sugar
1 1/2 sticks unsalted butter (softened)
2.5 teaspoon(s) instant espresso powder, dissolved in 1 tablespoon boiling water
approximately 10 walnut halves
Preheat the oven to 350 degrees. Butter the 2 8-inch round cake pans and line the base of each with parchment paper.
Put the walnut pieces and sugar into a food processor and blitz to a fine nutty powder.
Add the 2 sticks of butter, flour, 4 teaspoons espresso powder, baking powder, baking soda and eggs and process to a smooth batter.
Add the milk, pouring it down the funnel with the motor still running, or just pulsing, to loosen the cake mixture: it should be a soft, dropping consistency, so add more milk if you need to. (If you are making this by hand, bash the nuts to a rubbly powder with a rolling pin and mix with the dry ingredients; then cream the butter and sugar together, and beat in some dry ingredients and eggs alternately and, finally, the milk.)
Divide the mixture between the 2 cake pans and bake in the oven for 25 minutes, or until the sponge has risen and feels springy to the touch.
Cool the cakes in their tins on a wire rack for about 10 minutes, before turning them out onto the rack and peeling off the parchment paper.
When the sponges are cool, you can make the buttercream.

To make the frosting:
Pulse the powdered sugar in the food processor until it is lump free, then add the butter and process to make a smooth icing.
Dissolve the instant espresso powder in 1 tablespoon boiling water and add it while still hot to the processor, pulsing to blend into the buttercream.
If you are doing this by hand, sieve the icing sugar and beat it into the butter with a wooden spoon. Then beat in the hot coffee liquid.
Place 1 sponge upside down on your cake stand or serving plate.
Spread with about half the icing; then place on it the second sponge, right side up (i.e. so the 2 flat sides of the sponges meet in the middle) and cover the top with the remaining icing in a ramshackle swirly pattern.
This cake is all about old-fashioned, rustic charm, so don’t worry unduly: however the frosting goes on is fine. similarly, don’t fret about some buttercream oozing out around the middle: that’s what makes it look so inviting.
Gently press the walnut halves into the top of the icing all around the edge of the circle about 1/2 inch apart.
Cuts into 8 generous slices.
Bye-bye 2012, hello 2013!
Can you believe that 2012 is coming to a close already? I don’t know where this year has gone. I think I’ll forever think of 2012 as a quick moving current, a pleasant but very swift breeze! I resolve in 2013 to try to take things slower (if that’s even possible with two small children!) and make the most of every minute!
Yesterday, I baked up another batch of gingerbread. I’ve hardly baked much this whole year and yet in the past couple of weeks, our kitchen has been the center of the universe (as it usually is this time of year!) and I’ve done some successful baking! This time, I went with Nigella Lawson’s Guinness Gingerbread, which is every bit as heavenly as it sounds. There’s only a cup of Guinness in the recipe, but it’s enough to give the recipe a little something-something. The lack of molasses this time around also makes for a less strong, more child-friendly cake. I found it to be the best kind of spice cake imaginable – super moist and sticky, without screaming “Christmas.” It’s gingerbread for these post-Christmas days and the kids loved it.

Have a wonderful New Year’s and all the best to you in 2013! I’ll see you back here on Thursday!
Nigella’s Guinness Gingerbread
1 1/4 sticks 10 (tablespoons) butter, plus some for greasing
1 cup golden syrup (such as Lyle’s)
1 cup (packed) plus 2 tablespoons dark brown sugar
1 cup stout (such as Guinness)
2 teaspoons ground ginger
2 teaspoons ground cinnamon
1/4 teaspoon ground cloves
2 cups all-purpose flour
2 teaspoons baking soda
1 1/4 cups sour cream
2 eggs
1 rectangular aluminium foil pan or cake pan, approximately 13 by 9 by 2-inches
Preheat your oven to 325 degrees F. Line your cake pan with aluminium foil and grease it, or grease your foil tray.
Put the butter, syrup, dark brown sugar, stout, ginger, cinnamon and ground cloves into a pan and melt gently over a low heat.
Take off the heat and whisk in the flour and baking soda. You will need to be patient and whisk thoroughly to get rid of any lumps.
Whisk the sour cream and eggs together in a measuring jug and then beat into the gingerbread mixture, whisking again to get a smooth batter.
Pour this into your cake/foil pan, and bake for about 45 minutes; when it’s ready it will be gleamingly risen at the centre, and coming away from the pan at the sides.
Let the gingerbread cool before cutting into slices or squares.
Nigella’s sticky gingerbread
I feel like we need to tack an additional 14 days to December to revel in the fun of the season – more time to watch “Home Alone” and “Elf” and “The Holiday,” for Bailey’s Irish Cream nightcaps and for filling the house with the smell of baked goods.
I’ve failed on the last item this month – I’ve wanted to make these gingerbread houses, not to mention this and these. But one thing I did manage was a batch of sticky gingerbread from Nigella Christmas.
I’ve never made gingerbread before but after Starbucks abruptly ended their run on gingerbread loaf pre-Christmas, I had to get my fix elsewhere. Nigella’s recipe is absolutely fantastic – easy to do and actually gets better by the day! Here’s my adapted recipe. Enjoy the remains of the season and will see you back here on Thursday! Have a happy Christmas with you and yours.

Sticky Gingerbread
Makes 20 squares
1 stick plus 3 tablespoons butter
3/4 cup dark corn syrup
3/4 cup molasses
2/3 cup packed soft dark brown sugar
3 teaspoon ground ginger
1 teaspoon ground cinnamon
1/4 teaspoon ground cloves
1 teaspoon baking soda, dissolved in 2 teaspoons warm water
1 cup whole milk
2 eggs, beaten to mix
2 cups all-purpose flour
Preheat the oven to 350F and line a roasting pan or ovenproof dish (approx. 12 x 8 x 2-inches) with aluminum foil or parchment paper (if using foil, grease it too).
In a saucepan, melt the butter over a lowish heat along with the sugar, syrup, molasses, fresh and ground gingers, cinnamon and cloves.
Take off the heat, and add the milk, eggs and dissolved baking soda in its water.
Measure the flour into a bowl and pour in the liquid ingredients, beating until well mixed. It will be a very liquid batter, so don’t worry. This is part of what makes it sticky later.
Pour it into the prepared pan and bake for 45-60 minutes until risen and firm on top. Try not to overcook, as it is nicer a little stickier, and anyway will carry on cooking as it cools.
Transfer the pan to a wire rack and let the gingerbread cool in the pan before cutting into 20 squares, or however you wish to slice it.
Make ahead tip:
Make the gingerbread up to 2 weeks ahead, wrap loosely in parchment paper and store in an airtight container. Cut into squares as required.
Freeze ahead tip:
Make the gingerbread, wrap in parchment paper and a layer of aluminum foil then freeze for up to 3 months. Thaw at room temperature for 3-4 hours and cut into squares.
Cake that’s worth the wait
Good news! I made my husband the ultra-British coffee and walnut cake that I had promised! Even better, it was actually really good, thanks to a recipe from Nigella Lawson’s Nigella Kitchen cookbook!
Her version is very simple, particularly since all of the ingredients go straight into the food processor and are blitzed.

The “coffee” ingredient she recommends is instant espresso powder, which I didn’t even know existed, but was easy to find in our nearest grocery store.

After exactly 25 minutes, they were ready.

I waited 10 minutes as instructed before moving the cakes to the cooling racks. The cakes just eased out of the pans, as if on cue. It was amazing.

The frosting was also very simple to make (powdered sugar, butter and instant espresso powder in a little bit of boiling water) but was easily the best buttercream frosting recipe I’ve ever made. I was exceedingly proud of how pretty this cake turned out – just look!

I’ll definitely make it again in non-birthday circumstances. I can easily see this turning into my go-to cake to bake! Note: if you’re making the cake for kids, you can always tone down the caffeine quotient by replacing the 4 teaspoons of instant espresso powder with 2 teaspoons of instant coffee granules. (Or you can just serve it first thing in the morning and call it breakfast).
COFFEE AND WALNUT LAYER CAKE
For the sponge
1/2 cup walnuts (pieces)
1 cup plus 2 tablespoons superfine sugar
2 sticks unsalted butter (soft (plus some for greasing))
1 1/3 cups plain flour
4 teaspoon(s) instant espresso powder
2.5 teaspoon(s) baking powder
½ teaspoon(s) baking soda
4 medium egg(s)
2 tablespoon(s) milk
For the buttercream frosting
3 1/4 cups powdered sugar
1 1/2 sticks unsalted butter (softened)
2.5 teaspoon(s) instant espresso powder, dissolved in 1 tablespoon boiling water
approximately 10 walnut halves
Preheat the oven to 350 degrees. Butter the 2 8-inch round cake pans and line the base of each with parchment paper.
Put the walnut pieces and sugar into a food processor and blitz to a fine nutty powder.
Add the 2 sticks of butter, flour, 4 teaspoons espresso powder, baking powder, baking soda and eggs and process to a smooth batter.
Add the milk, pouring it down the funnel with the motor still running, or just pulsing, to loosen the cake mixture: it should be a soft, dropping consistency, so add more milk if you need to. (If you are making this by hand, bash the nuts to a rubbly powder with a rolling pin and mix with the dry ingredients; then cream the butter and sugar together, and beat in some dry ingredients and eggs alternately and, finally, the milk.)
Divide the mixture between the 2 cake pans and bake in the oven for 25 minutes, or until the sponge has risen and feels springy to the touch.
Cool the cakes in their tins on a wire rack for about 10 minutes, before turning them out onto the rack and peeling off the parchment paper.
When the sponges are cool, you can make the buttercream.
To make the frosting:
Pulse the powdered sugar in the food processor until it is lump free, then add the butter and process to make a smooth icing.
Dissolve the instant espresso powder in 1 tablespoon boiling water and add it while still hot to the processor, pulsing to blend into the buttercream.
If you are doing this by hand, sieve the icing sugar and beat it into the butter with a wooden spoon. Then beat in the hot coffee liquid.
Place 1 sponge upside down on your cake stand or serving plate.
Spread with about half the icing; then place on it the second sponge, right side up (i.e. so the 2 flat sides of the sponges meet in the middle) and cover the top with the remaining icing in a ramshackle swirly pattern.
This cake is all about old-fashioned, rustic charm, so don’t worry unduly: however the frosting goes on is fine. similarly, don’t fret about some buttercream oozing out around the middle: that’s what makes it look so inviting.
Gently press the walnut halves into the top of the icing all around the edge of the circle about 1/2 inch apart.
Cuts into 8 generous slices.
Toad in the hole

When fall begins to assert itself, we love nothing more than a comforting dish like Toad in the Hole. We made some last week, just as the weather started to cool.
Don’t worry. No toads were harmed in the making of this meal. The origins of Toad in the Hole are here.
If you’ve ever had a Bullock’s popover (does anyone remember the department store Bullock’s and their delicious popovers, which were basically Yorkshire puddings?), imagine this done big, studded with British bangers (translation: sausages). My husband uses the Yorkshire pudding recipe from Nigella Lawson’s Feast cookbook as the base for the Toad in the Hole:
1 1/3 cups 2% milk
4 eggs
1/2 tsp salt
1 2/3 cups all-purpose flour
Packet of British bangers
Whisk the milk, eggs and salt well and let stand for 15 minutes, then whisk in the flour and let stand again until you need it. Cook at 450 degrees. Put the muffin tin in the oven to heat up for a good 10-15 minutes, with vegetable oil at the bottom. Add British bangers (we cut ours in half). When the pan and oil has been heated, pour in the yorkshire pudding batter and cook for 15-20 minutes or until they have puffed up gloriously.
Whitebait

Photo credit: Thefishsociety.co.uk
Where do you stand on the great whitebait debate? Have you ever tried it? Do you like it or hate it?
Whitebait are very small fish that you eat whole, head, tail, guts and all. They’re usually deep fried and served with lemon and are very popular in the U.K. (as well as New Zealand, Greece, etc.) Not so big in America.
Personally, I’ve never tried them and doubt that I ever will. I don’t know if it’s a specific American sensibility of mine, but I can’t eat fish if the head is still attached. It’s a problem, particularly since Europeans don’t seem to have this sensitivity. I’ll never forget the time I ordered sole meunière when we visited a coastal town in Normandy, France, and they brought it to me whole. It was the sort of dish that would have automatically come as a filet, had we been in the U.S. and then I was too embarrassed to ask them to remove the head.
Anyway, I digress. Waitbait… care to try it? This recipe comes courtesy of Nigella Lawson.
Ingredients
- Vegetable oil, for frying
- 18 ounces whitebait
- 1/2 cup all-purpose flour
- Salt and freshly ground black pepper
- 1 bunch fresh curly parsley
- Maldon or other sea salt
- Lemon wedges, for plating
Heat the oil for frying in a deep-fat fryer to about 375 degrees F.
Put the whitebait and the seasoned flour into a plastic bag, and toss everything around to coat the fish.
Shake the excess flour by turning out the whole bag into a metal sieve, and then plunge the little fishes into the oil. Cook for about 3 minutes or until they look crispy and tempting – though I can see that for a squeamish generation, the idea of eating baby fish, whole, might not tempt. How wrong they are, if that’s the case.
Turn them out onto paper towels, and while the fish are losing any excess oil (we want desirable crunch) throw in a small handful of parsley leaves to deep-fry; watch out, it will spit. (A splatter guard is useful. Not charming, but useful.) When they have turned a very dark green, drain and serve with the whitebait, well sprinkled with sea salt and surrounded with lemon wedges.
Guacamole? No, roquamole!

Yesterday, we had friends over for a lazy afternoon and an early dinner. The emphasis was on simple, and so I rolled out Nigella Lawson’s roquamole.
Roquamole is her luscious blend of roquefort and avocado – certainly not traditional by a long shot, but a delicious variation on the usual. What I like about this recipe is the customization factor – in this case, I went with a gorgonzola, instead of a sharper roquefort and then subbed out the jalapeños for Ortega green chilies (since we had kids to feed and wanted to keep things on the mild side). I served this with thick tortilla chips (Casa Sanchez gruesos), along with sliced radishes and carrot sticks for dipping. Delish!
Here’s the original recipe – again, feel free to change it up a bit to make it your own. It’s very forgiving!
Roquamole
1 cup crumbled Roquefort or Saint Agur blue cheese
1/4 cup sour cream
2 ripe avocados
1/4 cup sliced pickled green jalapeños from a jar
2 tablespoons finely sliced scallions
1/4 teaspoon paprika
large bag of blue corn tortilla chips
1. Crumble or mash the blue cheese with the sour cream in a bowl.
2. Mash in the avocados. If they are ripe, a fork should be all you need.
3. Roughly chop the sliced jalapeños and stir them into the mixtrue along with the finely sliced scallions.
4. Arrange in the center of a plate or dish, dust with paprika, and surround with tortilla chips. Dive in.
Serves 4-6.
Fish pie

Sunday night, we had fish pie. Think firm white fish (we went with cod and tilapia this time), cooked in a creamy roux, added some peas, topped with a layer of sliced boiled eggs, and then topped again with mashed potatoes and grated cheddar cheese. Bake it in the oven for 20 minutes or so, until the top is crispy and browned (we used the broiler to give it an extra oomph of crispiness) and voila! Dinner was done.
It is a supremely delicious and comforting British dish. Here’s the recipe, courtesy of Nigella Lawson.
Nursery Fish Pie
Serves 8
3lbs all-purpose potatoes
1 1/2 sticks butter
1 1/2 lbs haddock
2lbs 4oz smoked haddock
2 cups whole milk
3 bay leaves
1 tablespoon white peppercorns
1 cup frozen peas
1/2 cup all-purpose flour
1 1/2 cups Cheddar cheese, grated
3 hard-boiled eggs
Peel the potatoes and cut them in half or quarters, depending on size, and put them in a pan of salted water to cook from cold. When they’re tender, drain and then mash them with 3/4 stick of the butter, seasoning to taste.
Put the fish into a large skillet with the milk, bay leaves and peppercorns. Bring the milk in the pan to a boil, then immediately turn down and simmer the fish until it is just cooked through. Remove the fish to a plate and pour the cooking liquid into a glass measuring cup, straining out the bay leaves and peppercorns.
Meanwhile, put the frozen peas in a bowl, pour over some boiling water and preheat the oven to 375°F, slipping in a baking sheet as you do so.
Melt the remaining 3/4 stick butter in a saucepan and stir in the flour to make a roux. Take this off the heat briefly, just while you gradually whisk in the fishy milk, then put back over a medium heat and keep stirring until the sauce comes to a boil and thickens. Let it bubble away for a couple of minutes and then take off the heat and stir in most of the cheese (leaving some to sprinkle over the top of the pie later) and the drained peas.
Flake the fish, making sure not to let it disintegrate too much, and use it to line a 12-cup ovenproof dish and pour the sauce over, using a rubber spatula to help you distribute it equally and meld it with the fish. Cut the hard-boiled eggs into slices and arrange the golden-centered discs over the top of the fish in sauce. Top with the mashed potato, using a spatula, again, to help you coax it right over the sides. With a fork, scrape lines up and down the length of the dish and then sprinkle with a little grated Cheddar cheese before putting it on the sheet in the oven for 20–40 minutes, depending on whether you’re putting the pie in hot or cold.
